KiCad integration
pinout provides integration with KiCad (version 5 and 6) allowing users to author pinout content directly onto a PCB design. This allows a better separation of layout and content where KiCad can become a single content source for a diagram template.
Before you start
Create or obtain (see following note) a KiCad project! This project must include a PCB design which will be enhanced with additional pinout information.
Ensure pinout is installed. For more information regarding this step please refer to Install and quickstart
Optionally, duplicate the pinout config file. Some KiCad library settings can be customised from this file - Most usefully, the layer that library footprints appear on can be changed:
py -m pinout.manager -d config
Note
Sample files that demonstrate KiCad (version 6) integration are included with pinout. Once duplicated and unzipped, running the python script will export an example diagram:
# Duplicate zipped folder with KiCad 6 project and pinout files
py -m pinout.manager -d kicad

# Expected output:
# >>> pinout_kicad_example.zip duplicated.

# Export pinout diagram from unzipped folder
# >>> py -m pinout.manager -e pinout_diagram.py diagram.svg -o

# Expected output:
# >>> 'diagram.svg' exported successfully.
Create a KiCad footprint Library
pinout generates its KiCad footprint library from the command line py -m pinout.manager <destination folder> <config file> --version <kicad version>. ‘config file’ and ‘version’ are optional. If omitted the version defaults to ‘6’ and default config settings are used:
#Example: KiCad 6, saving into the current directory
py -m pinout.manager --kicad_lib .

#Example: KiCad 6, saving into the current directory and referencing a config file
py -m pinout.manager --kicad_lib . config.py

#Example: KiCad 5, saving into the relative directory named 'lib'
py -m pinout.manager --kicad_lib ./lib -v 5

# Expected output:
# >>> pinout footprint library for KiCad created successfully.
A folder named pinout.pretty will now be present at the location referenced in the command. This folder can be added as a footprint library in your KiCad project.
Note
KiCad 6: Footprints are on User.1 layer by default.
KiCad 5: Footprints are on Eco1.User layer by default.
Warning
KiCad 6 allows users to assign an alias to layer names. Only use KiCad’s default layer names when generating a pinout library.
The pinout footprints can now be added to KiCad like any other footprint library and added to an existing design in the PCB Editor.
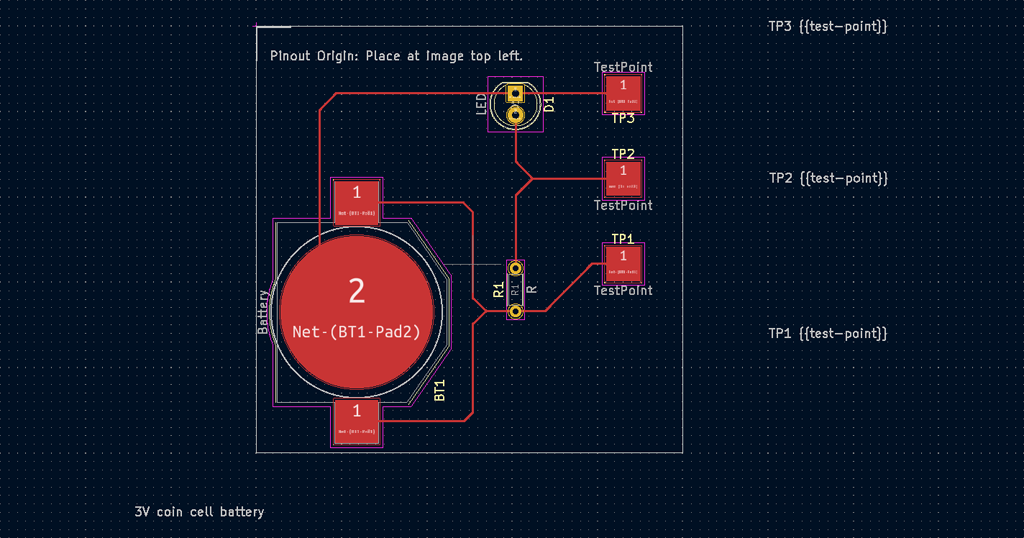
Add an origin
The hardware image used in a diagram must be aligned to KiCad’s coordinate system for pinout to successfully align components. This can be done by placing an Origin footprint at a corrosponding location in KiCad. The origin footprint marks where an image’s top-left corner will be positioned.
Add pin-labels
Select the PinLabel footprint from the Choose Footprint dialogue.
Place the footprint at the pin location
Move the Value text to the desired label location
Edit the text value to reflect label content and styling.
Multiple labels can be documented for a single pin by adding additional text {{tag}} pairs to the Value field. For example this become a row of three labels:
GPIO1 {{gpio}} ADC {{analog}} TOUCH {{touch}}
By editing the footprint two more fields, that are hidden by default, can be viewed and edited. The Reference designator documents the footprints purpose and can be altered without affecting pinout’s functions. The additional field is used to document pin-label attributes.
Currently only the pin-label leaderline attribute is supported. It can be changed to suit the desired layout and reflects start/end leaderline directions. Valid values are:
hh: horizontal - horizontal
vh: vertical - horizontal
Add an annotation
Annotations can be added by the same method as pin-labels. 1. Select the Annotation footprint from the Choose Footprint dialogue. 2. Place the footprint at the location to be annotated 3. Move the Value text to the desired label location 4. Edit the text value to reflect label content and styling.
Tagging the annotation is done with the same ‘moustache’ style tag {{tag}}. The tag text is applied to the final annotation as a css class. Further styling can then be applied via the CSS stylesheet.
By editing the annotation footprint other fields can be accessed and altered - with the same features and limitations - as the PinLabel footprint.
Add a textblock
A diagram is likely to require text content that is independent from the pinout diagram itself - for instance titles and explainatory notes. To assist with this pinout provides the facility to import ‘Text items’ from KiCad.
KiCad’s Text item tool is the ideal interface to authoring blocks of text. This tool cannot be used within a footprint but pinout collates all Text items that include a moustache-style tag {{ tag-content }} in them. A dictionary is then returned for use within a pinout script. For example:
# import kicad pcb data into pinout
kdata = k2p.PinoutParser("kicad6_test.kicad_pcb", dpi=72)

# Retrieve 'Text item' content from KiCad as a dictionary
text = kdata.gr_text()

# Use Text item content to populate a TextBlock
diagram.add(TextBlock(text["txt_tag_01"], tag="txt_tag_01", x=20, y=30))
Note
Text content must be valid SVG markup. For example the ampersand character “&” must be encoded correctly “&”. Valid tags can also be included and will be rendered as part of the SVG. For example using a <tspan> tag provides scope for multiple styles within a single block of text:
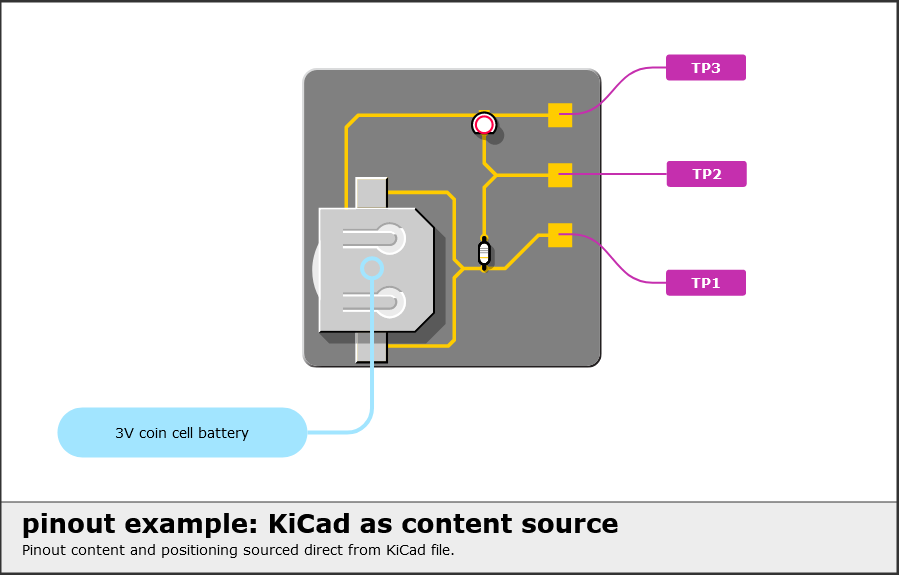
{{pinout_title}}<tspan class="h1">pinout example: KiCad as content source</tspan>
<a href="https://pinout.readthedocs.io">Pinout</a> content & positioning sourced direct from KiCad file.
# .h1 styles in the css file are applied to the text.
Import KiCad data
With pinout content documented in KiCad it can now be imported into a pinout Python script. The following code snippets are directly from the sample files mentioned at the start of this article. Code for an entire working sample will be duplicated here but descriptions will focus on relevant aspects only.
Both Kicad versions 5 and 6 use the same module. With the module imported a link to the kicad_pcb file can be established:
from pinout.core import Group, Image
from pinout.components.layout import Diagram_2Rows
from pinout.components.text import TextBlock
from pinout import kicad2pinout as k2p

# Import KiCad data
kdata = k2p.PinoutParser("kicad_6_pcb/kicad_6_pcb.kicad_pcb", dpi=72, version=6)
Template layout
Whilst labelling can be done in KiCad the overall diagram layout must still be addressed. See the Tutorial for more details on this:
# Create diagram layout
diagram = Diagram_2Rows(900, 575, 500, tag="diagram")
diagram.add_stylesheet("styles.css")


# Using a 'group' component for easy alignment of all sub-components
graphic = diagram.panel_01.add(Group(300, 65))


# Add an image that corrosponds to the KiCad PCB.
img = graphic.add(Image(src="pcb_graphic.svg", width=300, height=300))
Link an image
Coordinate data from KiCad must be transformed and aligned with the supplied image. This not only translates coordinates to align with the origin footprint but also scales and rotates to remain aligned with an image that has been transformed in pinout:
# KiCad coordinates will be transformed to match the linked image.
kdata.link_image(img)
Add labels and Annotations
With KiCad data successfully imported and associated with the image it will enhance, adding pin-labels and annotations is easy:
 # Add pin-labels and annotations to the 'graphic' group
kdata.add_pinlabels(graphic)
kdata.add_annotations(graphic)
Access text from KiCad
To better separate content and layout pinout can also import text content from KiCad. pinout scripts can become reuable templates with minimal changes. All text-items that include a ‘moustache’ style tag are collated into a dict for access in the script. In this example text is used to fill a title block:
# Text from KiCad can be accessed as a dict
textblocks = kdata.gr_text()
diagram.panel_02.add(TextBlock(textblocks["pinout_title"], x=20, y=30))
Export a diagram
The diagram can now be exported in the normal way. For the example script this should go smoothly with predictable results. For other kicad file that include more/different label and tags a revised CSS file needs to be created. pinout can provide a reasonable starting point with its auto-styling feature. Don’t forget to update ‘add_stylesheet’ in the script!
# OPTIONAL EXTRA: Auto generate styles
# >>> py -m pinout.manager --css pinout_diagram.py autostyles.css -o

# Export diagram as SVG:
# >>> py -m pinout.manager -e pinout_diagram.py diagram.svg -o